LLM Zoomcamp 2026
This is the course summary page for the LLM Zoomcamp by DataTalksClub on GitHub. The course can be found here
Index
| Lecture | Notes | Homework |
|---|---|---|
| Lecture 1 - Agentic RAG | 1. Agentic Rag | Homework 1 |
| 1.1 Introduction | 1-1 Introduction | |
| 1.2 Environment | 1-2 Environment | |
| 1.3 What is RAG | 1-3 What is RAG (Retrieval-Augmented Generation) | |
| 1.4 The Course FAQ dataset | 1-4 The Course FAQ Dataset | |
| 1.5 Search | 1-5 Search | |
| 1.6 Building a Prompt | 1-6 Building a Prompt | |
| 1.7 RAG Pipeline | 1-7 RAG Pipeline | |
| 1.8 RAG Helper | 1-8 RAG Helper | |
| 1.9 Data Ingestion | 1-9 Data Ingestion | |
| 1.10 RAG Next Steps | 1-10 RAG Next Steps | |
| 1.11 Agents Intro | 1-11 Agents Intro | |
| 1.12 RAG Revision | ||
| 1.13 Function Calling | 1-13 Function Calling | |
| 1.14 Agentic Loop | 1-14 The Agentic Loop | |
| 1.15 ToyAIKit | 1-15 ToyAIKit | |
| 1.16 Other Frameworks | ||
| 2. Vector Search | 2. Vector Search | |
| 2.1 What is Vector Search | 2-1 What is Vector Search | |
| 2.2 Embeddings | 2-2 Embeddings | |
| 2.3 Embedding Our Dataset | 2-3 Embedding Our Dataset | |
| 2.4 Vector Search | 2-4 Vector Search | |
| 2.5 Vector Search with minsearch | 2-5 Vector Search with minsearch | |
| 2.6 RAG with vector search | 2-6 RAG with vector search | |
| 2.7 Vector Search with sqlitesearch | 2-7 Vector Search with sqlitesearch | |
| 2.8 Vector Search with PGVector | 2-8 Vector Search with PGVector | |
| 2.9 ONNX Embedder | 2-9 ONNX Embedder | |
| 3. Orchestration | 3. Orchestration | |
| 3.1 Introduction | ||
| 3.2 Context Engineering | ||
| 3.3 Setting up Kestra | 3-3 Setting up Kestra | |
| 3.4 AI Copilot | ||
| 3.5 Retrieval Augmented Generation | 3-5 Retrieval Augmented Generation | |
| 3.6 AI Agents | 3-6 Agents | |
| 3.7 Multi-Agent Systems | 3-7 Multi-Agent Systems | |
| 3.8 Best Practices | 3-8 Best Practices | |
| 3.9 Next Steps | ||
| 4. Evaluation | 4. Evaluation | |
| 5. Monitoring | 5. Monitoring | |
| 6. Best Practices | 6. Best Practices | |
| 7. End-to-End Project | 7. End-to-End Project | |
| Capstone Project | Capstone Project |
1. Agentic RAG
1-1 Introduction
- LLM is to predict the next words, given a set of words.
- LLMs are trained on vast volumes of data available across the Internet, and has millions and billions of parameters in its architecture
- In lecture 1, we treat LLMs as a black box and focus on integrating LLM providers for Retrieval-Augmented Generation (RAG) FAQ agent for the course
1-2 Environment
Pre-requisites
- Python (3.14 or later)
- OpenAI account
- Python and CLI familiarity
uvpackage manager
Create a dedicated repository for the rest of the course (something like llm-zoomcamp-2026-code). When working through local system, clone your repo to your local system
Step 1: Create the Project from scratch with uv
Ensure you have the uv package manager installed - pip install uv
Step 2: Create the project
Library dependencies
requests- Fetch the dataset from the internetminsearch- In-memory search engine for searching textopenai- OpenAI API client (Can use other OpenAI compatible APIs)jupyter- Notebook env to write and run codepython-dotenv- Read env variables
Step 3: Initialize the project, add the pyproject.toml and install the dependencies - uv init
Step 4: Create the file notebook.ipynb - Notebook for the lesson
Step 5: Create the .gitignore
Step 6: Store the OpenAI API Key in .env in the repo root
IMPORTANT: Do not share your OpenAI API key with anyone or commit it to your repo
Step 7: Loading API key and creating OpenAI Client
You can load the API Key with the help of python-dotenv in the notebook
Once the API Key is loaded, you can create the API client which will use the API Key to authenticate and connect to OpenAI models
1-3 What is RAG
- RAG = Retrieval-Augmented Generation
- Most common application of LLMs
- RAG allows us to access information that the LLM is not aware of, and inject it into the inputs provided to the LLM which makes LLM responses more accurate and clear
We want to build a RAG system that can answer user queries based on information provided in the course FAQ
Step 1: Define the function to send inputs and receive outputs from the LLM
def llm(prompt):
response = openai_client.responses.create(
model = 'gpt-5.4-nano', #Put your desired model name here, gpt-5.4-nano is the smallest and cheapest as of June 2026
input = prompt
)
return response.output_text
question = 'I just discovered the course. Can I join now?'
answer = llm(question)
print(answer)
LLM response is generic, and may not reflect the actual results of joining the course late, or if the course is even open for late enrollment.
Step 2: Add context information from course FAQ to the LLM prompt
The information about the possibility of joining late can be found in the course FAQ, which we can use as the content to enhance the information available to the LLM to respond to the user query.
context = 'your-context-here'
prompt = f'''Your task is to answer questions from the course participants based on the provided context.
Use the context to find relevant information and provide accurate answers.
Question:
{question}
Context:
{context}
'''
answer = llm(prompt)
print(answer)
This time, the answer is more specific since information from the FAQ is provided to the LLM as additional information to respond to the user's query. When provided this additional information, the LLM determines which parts of the information are relevant
RAG Architecture

Three steps of building a RAG FAQ:
- Retrieval - search for relevant information
- Augmentation - Augment user query with search results
- Generation - Send user query + search results to LLM to generate response
1-4 The Course FAQ Dataset
The data about the available courses can be found in JSON format here. We first get the data about the available courses with the requests library
import requests
docs_url = "https://datatalks.club/faq/json/courses.json"
response = requests.get(docs_url)
courses_raw = response.json()
courses_raw gives the data about courses which are available. Using this, we can get the FAQ data for the desired courses
documents = []
url_prefix = "https://datatalks.club/faq"
for course in courses_raw:
course_url = f"""{url_prefix}{course["path"]}"""
course_response = requests.get(course_url)
course_response.raise_for_status() # If something is broken, then raise an error
course_data = course_response.json()
documents.extend(course_data)
len(documents)
Note: In real-world implementations, you will spend a lot of time ingesting and cleaning data which we need
1-5 Search
For a simplified search engine use minsearch, so that you can send a subset of the documents as context instead of all the documents for more effective responses. Other search engine options include lucene, elastic search etc. Many of these search engines are heavy and can need docker containers to run.
minsearch is a lightweight toy implementation of a search engine that can be used for small datasets.
Step 1: Index the documents
from minsearch import Index
index = Index(
text_fields=['question', 'section', 'answer'], # Fields to use for searching
keyword_fields=['course'] # Looks for exact match inside the course, acts as a filter which restricts the search space for further search with text_fields
)
index.fit(documents) # Fitting the index to make it ready for search
Step 2: Search the index for relevant documents for the given question
search_results = index.search(
query='How do I run Docker on Windows?',
num_results=5, #Restrict to 5 results
boost_dict={'question':3.0, 'section':0.5} # During search 'question' is given 3.0 weightage (more importance) when looking for relevant documents, 'section' is given 0.5 weightage. Default boost is 1.0 for all fields
)
Step 3: Define a search function for use by the RAG assistant
def search(question, course="llm-zoomcamp"):
boost_dict = {"question": 2.0, "section": 0.5}
filter_dict = {"course": course}
return index.search(
query=question,
boost_dict=boost_dict,
filter_dict=filter_dict,
num_results=5
)
search_results = search(question)
1-6 Building a Prompt
When building AI systems, we often have prompts consisting of 2 parts
- Instructions - Never changes
- User prompt - Changes with user input
Step 1: Define the instructions for the LLM
INSTRUCTIONS = """
Your task is to answer questions from the course participants
based on the provided context.
Use the context to find relevant information and provide accurate
answers. If the answer is not found in the context,
respond with "I don't know."
"""
Step 2: Define the user prompt template that dynamically updates the user input
Step 3: Define function to build the context string
The documents are present as items in a dictionary. The context information needs to be presented as a string to include it in the user prompt
def build_context(search_results):
lines = []
for doc in search_results:
lines.append(doc["section"])
lines.append("Q: " + doc["question"])
lines.append("A: " + doc["answer"])
lines.append("")
return "\n".join(lines).strip()
Step 4: Building the full prompt
def build_prompt(question, search_results):
context = build_context(search_results)
prompt = USER_PROMPT_TEMPLATE.format(
question=question,
context=context
)
return prompt.strip()
prompt = build_prompt(question, search_results)
print(prompt)
1-7 RAG Pipeline
The last part of the RAG pipeline is the LLM which takes the prompt as input and generates an output.
OpenAI has 2 APIs:
- ChatCompletion (older API, considered legacy)
- Responses (newer API, more convenient, what we will use)
response = openai_client.responses.create(
model="gpt-5.4-mini", # Can use other models if needed
input=prompt
)
Response exploration
print(response.output) # List of output items
print(response.output[0]) # Output message is the 1st list item
print(response.output[0].content[0].text) # Text message is the 1st item inside the content
print(response.output_text) # Shortcut to get the text message
print(response.usage) # Tokens consumed by response in a ResponseUsage object, provide counts of input, output tokens splitup as well
Calculating the price
input_price = 0.75 / 1_000_000 # From model card
output_price = 4.50 / 1_000_000 # from model card
cost = (
response.usage.input_tokens * input_price +
response.usage.output_tokens * output_price
)
print(cost)
Sending message history as input to LLM
We can send historical messages as a list of dictionaries (each dictionary contains the role of the message sender and the message text) as input to the LLM
message_history = [
{"role": "developer", "content": INSTRUCTIONS}, # System prompt instructions
{"role": "user", "content": prompt} # User input
]
response = openai_client.responses.create(
model="gpt-5.4-mini",
input=message_history
)
Define final LLM function with message history
def llm(instructions, user_prompt, model="gpt-5.4-mini"):
message_history = [
{"role": "developer", "content": instructions}, #Can replace developer with 'system' to pass instructions, not too much of a difference in the case of Responses API
{"role": "user", "content": user_prompt}
]
response = openai_client.responses.create(
model=model,
input=message_history
)
return response.output_text
Full RAG pipeline function
def rag(query, model="gpt-5.4-mini"):
search_results = search(query)
prompt = build_prompt(query, search_results)
answer = llm(INSTRUCTIONS, prompt, model=model)
return answer
1-8 RAG Helper
We take all the functions we have written and put them into reusable helper files.
# ingest.py
# Used for loading FAQ data, building search index
import requests
from minsearch import Index
def load_faq_data():
docs_url = "https://datatalks.club/faq/json/courses.json"
response = requests.get(docs_url)
courses_raw = response.json()
documents = []
url_prefix = "https://datatalks.club/faq"
for course in courses_raw:
course_url = f"""{url_prefix}{course["path"]}"""
course_response = requests.get(course_url)
course_response.raise_for_status()
course_data = course_response.json()
documents.extend(course_data)
return documents
def build_index(documents):
index = Index(
text_fields=["question", "section", "answer"],
keyword_fields=["course"]
)
index.fit(documents)
return index
# rag_helper.py
INSTRUCTIONS = """
Your task is to answer questions from the course participants
based on the provided context.
Use the context to find relevant information and provide accurate
answers. If the answer is not found in the context,
respond with "I don't know."
"""
PROMPT_TEMPLATE = """
QUESTION:
{question}
CONTEXT:
{context}
""".strip()
class RAGHelper:
def __init__(
self,
index,
llm_client,
instructions=INSTRUCTIONS,
prompt_template=PROMPT_TEMPLATE,
course="llm-zoomcamp",
model="gpt-5.4-mini"
):
self.index = index
self.llm_client = llm_client
self.instructions = instructions
self.course = course
self.prompt_template = prompt_template
self.model = model
def search(self, query, num_results=5):
boost_dict = {"question": 3.0, "section": 0.5}
filter_dict = {"course": self.course}
return self.index.search(
query,
num_results=num_results,
boost_dict=boost_dict,
filter_dict=filter_dict
)
def build_context(self, search_results):
lines = []
for doc in search_results:
lines.append(doc["section"])
lines.append("Q: " + doc["question"])
lines.append("A: " + doc["answer"])
lines.append("")
return "\n".join(lines).strip()
def build_prompt(self, query, search_results):
context = self.build_context(search_results)
return self.prompt_template.format(
question=query, context=context
)
def llm(self, prompt):
input_messages = [
{"role": "developer", "content": self.instructions},
{"role": "user", "content": prompt}
]
response = self.llm_client.responses.create(
model=self.model,
input=input_messages
)
return response.output_text
def rag(self, query):
search_results = self.search(query)
prompt = self.build_prompt(query, search_results)
answer = self.llm(prompt)
return answer
Using the helper functions
from dotenv import load_dotenv
load_dotenv()
from ingest import load_faq_data, build_index
from rag_helper import RAGBase
from openai import OpenAI
documents = load_faq_data()
index = build_index(documents)
openai_client = OpenAI()
custom_instructions = """
You're a course teaching assistant.
Answer the QUESTION based on the CONTEXT from the FAQ database.
Use only the facts from the CONTEXT when answering the QUESTION.
""".strip() # Can skip this in favor of the default instructions in rag_helper.py
assistant = RAGBase(
index=index,
llm_client=openai_client,
instructions=custom_instructions,
)
1-9 Data Ingestion
minsearchis in-memory and bound to the process it is running in. This means, if the notebook kernel it is running is shut down, the search index is lost.- This is not ideal when the dataset is large and you want to persist your dataset index across sessions
- Examples of persistent search engines include elastic search
Step 1: Split the ingestion from knowledge base querying
- We split the data ingestion and the RAG querying to run independently, so that they are connected by the persistent storage for the knowledge base
- We use
sqlitesearchwhich stores the data insqlitedatabase and has a default full text search (FTSS) extension with BM25 ranking
Install the library - uv add sqlitesearch
Next we write a notebook persistent_rag_ingest.ipynb for the data ingestion
from ingest import load_faq_data
import time

documents = load_faq_data()

docs_llm = [doc for doc in documents if doc['course'] == 'llm-zoomcamp']

from sqlitesearch import TextSearchIndex
index = TextSearchIndex(
    text_fields=["question", "section", "answer"],
    keyword_fields=["course"],
    db_path="faq.db"
)

for doc in docs_llm:
    index.add(doc)
    print(f"""Added: {doc["question"][:60]}...""")
    time.sleep(0.5) # Delay to ensure time gaps between writing data to DB

index.close()
print("Done. Index saved to faq.db")
Ensure to add the DB files to gitignore to avoid committing the data to git
Step 2: Switch to sqlitesearch from minsearch
We write a notebook persistent_rag.ipynb for the data loading and querying
from sqlitesearch import TextSearchIndex

sqlite_index = TextSearchIndex(
    text_fields=["question", "section", "answer"],
    keyword_fields=["course"],
    db_path="faq.db"
)

print(sqlite_index.count()) # Number of documents in the index

results = sqlite_index.search("Can I still join the course after it started?", num_results=5)
[doc["question"] for doc in results]
1-10 Wrap-up of Part 1
Things to try:
- Replace text search with vector search
- Replace OpenAI API with Anthropic, Gemini APIs etc
- Replace
minsearchwith Elasticsearch
1-11 Agents
- Current RAG pipeline's flow is fixed - search the knowledge base, build prompt with context and then LLM generates answer for user query with given context. This can have some issues:
- Text search is lexical - it looks for exact word matches, so queries with spelling errors can have missed out search results
- Agents can go one step further by allowing the LLM to parse the user query, and take decisions on whether a search function is needed at all. This makes the flow of the program more flexible. - This is the concept behind Agentic RAG
1-13 Function Calling
- In Agentic RAG, the LLM can decide the best available course of action including calling functions or stopping.
Step 1: Define function to search the index
def search(query):
    boost_dict = {"question": 3.0, "section": 0.5}
    filter_dict = {"course": "llm-zoomcamp"}

    return index.search(
        query,
        num_results=5,
        boost_dict=boost_dict,
        filter_dict=filter_dict
    )
Step 2: Write some description in JSON format (dictionary in python) for the search function
search_tool = {
    "type": "function",
    "name": "search",
    "description": "Search the FAQ database for entries matching the given query.",
    "parameters": {
        "type": "object",
        "properties": {
            "query": {
                "type": "string",
                "description": "Search query text to look up in the course FAQ."
            }
        },
        "required": ["query"],
        "additionalProperties": False
    }
}
Step 3: Pass the search function as a tool the LLM can choose to call
response = openai_client.responses.create(
    model="gpt-5.4-mini",
    input=messages, #Historical messages
    tools=[search_tool],
)

print(response.output)
The response is expected to be a ResponseFunctionToolCall object of type function_call. We can use this to initiate the index search
Step 4: Search the index based on LLM response
import json

call = response.output[0]
args = json.loads(call.arguments)

results = search(**args)
result_json = json.dumps(results, indent=2) # Indentation is to make it more human-readable, doesn't affect the LLM's response
Step 5: Send search result back to the LLM
LLMs is stateless, so it needs the entire history (original query -> Function call request -> Searching index results) to be sent in each call
messages.extend(response.output)

messages.append({
    "type": "function_call_output",
    "call_id": call.call_id, # call_id links the tool result to the function call requested by the model
    "output": result_json,
})

response = openai_client.responses.create(
    model="gpt-5.4-mini",
    input=messages,
    tools=[search_tool],
)

response.output_text
1-14 The Agentic Loop
- Till now, we are manually calling the LLM once we get the function call results. But it is possible that the LLM may choose to call the tools multiple (unknown) number of times.
- This brings the concept of Agentic Loop, where the LLM continues processing by calling for tools until it decides to not call them anymore.
Step 1: Write developer instructions to guide the behavior of the agent
instructions = """
You're a course teaching assistant.
You're given a question from a course student and your task is to answer it.

If you want to look up information, use the search function.
Use as many keywords from the user question as possible when making first requests.

Make multiple searches.

Try to expand your search by using new keywords
based on the results you get from the search.

At the end, ask if there are other areas that the user wants to explore.
""".strip()
We can improve the details given in the instructions for specific behaviors like:
- Restricting answers to only be from the knowledge base
- Input guardrails by specifying in-scope and out-of-scope etc.
Step 2: Define helper function which will help make function calls if the LLM asks to use tools
def make_call(call):
    args = json.loads(call.arguments)

    if call.name == "search":
        result = search(**args)

    result_json = json.dumps(result, indent=2)

    return {
        "type": "function_call_output",
        "call_id": call.call_id,
        "output": result_json,
    }
Step 3: Iteratively processing LLM inputs and outputs
In every iteration:
- Model chooses the next action
- The code executes the action and returns result to the model
The loop stops when there are no more tool calls.
def agent_loop(instructions, question, model="gpt-5.4-mini") -> str:
    messages = [
        {"role": "developer", "content": instructions},
        {"role": "user", "content": question}
    ]

    it = 1

    while True:
        print(f"iteration #{it}...")
        has_function_calls = False

        response = openai_client.responses.create(
            model=model,
            input=messages,
            tools=[search_tool]
        )

        messages.extend(response.output)

        for item in response.output:
            if item.type == "function_call":
                print("function_call:", item.name, item.arguments)
                call_output = make_call(item)
                messages.append(call_output)
                has_function_calls = True

            elif item.type == "message":
                print("ASSISTANT:")
                last_answer = item.content[0].text
                print(item.content[0].text)

        it = it + 1
        if has_function_calls == False:
            break

    return last_answer

agent_loop(instructions, "How do I run Olama locally?")
1-15 ToyAIKit
- To replicate the step-by-step agentic loop in the previous section, there is a framework
ToyAIKitwhich is for learning purposes. - Some other frameworks used in the industry includes Langchain, OpenAI Agent SDK, PydanticAI etc
To install it - uv add toyaikit
2. Vector Search
2-1 What is Vector Search
- Text search / Lexical search - Take the query, break it down into meaningful words, and look for documents which contains at least one of the words
- Different text search techniques - TF-IDF, BM25 etc
- Issue with text search - The search is for exact word matches, which means we could miss out on documents which has semantically similar words
2-2 Embeddings
- The concept of vectors for text search was introduced in Word2Vec. The main intuition is that words which are semantically similar have vectors which are closer to each other in the vector space (cosine of the angle between them is small)
- Word Embedding = Converting words to vectors
- Similar to word embeddings, phrases and sentences can also be converted to embedding vectors
- In vector search, we take the documents, convert them into embedding vectors in the vector space. When the user gives a question, the question is also converted to a vector, and the question's vector is used to select documents whose vectors are close in the vector space. In this process, we need to ensure the method of conversion to vectors for documents and questions is the same (For example:
sentence-transformerslibrary)
Step 1: Initialize the Sentence Transformer for embedding
from sentence-transformers import SentenceTransformer

model = SentenceTransformer('all-MiniLM-L6-v2') # For first time runs, the model can take some time to be downloaded from HuggingFace to local
Step 2: Encode the text query
query = "your-query-here"
q_vec = model.encode(query)
print(vector.shape) # Embedding vector shape

doc = "your-doc-text-here"
d_vect = model.encode(doc)
Step 3: Compare the similarity between query and document
2-3 Embedding Our Dataset
Step 1: Ingest the data
We use the same helper scripts and FAQ data as before (Refer to 1-8 RAG Helper)
Step 2: Generate embeddings per document
One document = 1 pair of question and answer from the FAQ
from tqdm.auto import tqdm
import numpy as np

texts = []

for doc in documents:
    text = doc["question"] + " " + doc["answer"]
    texts.append(text)

batch_size = 50 # Process the text in batches to avoid bulk processing all documents
vectors = []

for i in tqdm(range(0, len(texts), batch_size)):
    batch = texts[i:i + batch_size]
    batch_vectors = model.encode(batch) # Embedding happens faster if you have GPU
    vectors.extend(batch_vectors)

print(len(vectors)) # Total number of embeddings
X = np.array(vectors) # Convert the embeddings from list of embeddings to 2D numpy matrix of shape (number of documents x number of embedding dimensions)
2-4 Vector Search
Continuing from previous section,
Step 3: Compare the query embedding with document embeddings to select top closest documents to query
query = "Can I still join the course after the start date?"
v_query = model.encode(query)
scores = X.dot(v_query)

idx = np.argmax(scores) # Find the index of the closest or most similar matrix
print(idx, scores[idx])

top5 = np.argsort(scores)[-5:]
top5 = top5[::-1] # Reverse to get highest first
for idx in top5:
    print(scores[idx])
    print(documents[idx])
    print()
2-5 Vector Search with minsearch
We can use minsearch for vector search of the index
Step 4: Use VectorSearch in minsearch
from minsearch import VectorSearch

vindex = VectorSearch(keyword_fields=["course"])
vindex.fit(X, documents) # X is the vector

query = "I just discovered the course. Can I still join it?"
query_vector = model.encode(query)

results = vindex.search(query_vector, num_results=5)

results = vindex.search(
    query_vector,
    filter_dict={"course": "llm-zoomcamp"},
    num_results=5
)
2-6 RAG with Vector Search
Now we can build the entire RAG pipeline similar to 1-7 RAG Pipeline. We use the same rag_helper.py and ingest.py
from dotenv import load_dotenv
from openai import OpenAI
from ingest import load_faq_data, build_index
from rag_helper import RAGBase


class RAGVector(RAGBase):

    def __init__(self, embedder, **kwargs):
        super().__init__(**kwargs)
        self.embedder = embedder

    def search(self, query, num_results=5):
        # Overrides the search method in RAGBase class
        query_vector = self.embedder.encode(query)
        filter_dict = {"course": self.course}

        return self.index.search(
            query_vector,
            num_results=num_results,
            filter_dict=filter_dict
        )

load_dotenv()
openai_client = OpenAI()
documents = load_faq_data()
index = build_index(documents)

assistant = RAGVector(
    embedder=model,
    index=vindex,
    llm_client=openai_client,
)

query = "I just found out about the program, can I still sign up?"
assistant.rag(query)
2-7 Vector Search with sqlitesearch
Using vector search in minsearch has 3 issues:
- The index is rebuilt every time the program is started (index is not persistent)
- Index, vectors are in-memory
- Brute force search - query embedded vector is compared with every embedded document vector.
The brute force search can be approximated with approximate nearest neighbor (ANN). We narrow down to a region of possible matches, and then performs the comparisons only with vectors in that region
We can use sqlitesearch to implement vector search with ANN
from sqlitesearch import VectorSearchIndex
from rag_helper import RAGBase
from dotenv import load_dotenv
from openai import OpenAI

load_dotenv()
openai_client = OpenAI()

class RAGVector(RAGBase):

    def __init__(self, embedder, **kwargs):
        super().__init__(**kwargs)
        self.embedder = embedder

    def search(self, query, num_results=5):
        query_vector = self.embedder.encode(query)
        filter_dict = {"course": self.course}

        return self.index.search(
            query_vector,
            num_results=num_results,
            filter_dict=filter_dict
        )

vs_index = VectorSearchIndex(
    keyword_fields=["course"],
    mode="ivf",
    db_path="faq_vectors2.db"
)

vs_index.fit(vectors, documents)

vector_assistant = RAGVector(
    embedder=model,
    index=vs_index,
    llm_client=openai_client,
)

vector_assistant.rag("the program has already begun, can I still sign up?")

vs_index.close() # Close the index when done, but the data is persiste in the sqlite DB faq_vectors2.db
2-8 Vector Search with PGVector
PGVector allows us to store the embedded vectors inside PostgreSQL, which is a popular SQL DB.
Step 1: Start Postgres with pgvector in Docker container
Ensure you have Docker set up
docker run -it \
    --name pgvector \
    -e POSTGRES_USER=user \
    -e POSTGRES_PASSWORD=pswd \
    -e POSTGRES_DB=faq \
    -v pgvector_data:/var/lib/postgresql/data \
    -p 5432:5432 \
    pgvector/pgvector:pg17
Step 2: Setup the psycopg Python client for PostgreSQL
Step 3: Preparing the data
We use the same FAQ data as before
from tqdm.auto import tqdm

from ingest import load_faq_data
from sentence_transformers import SentenceTransformer

model = SentenceTransformer("all-MiniLM-L6-v2")

documents = load_faq_data()
texts = [doc["question"] + " " + doc["answer"] for doc in documents]

batch_size = 50
vectors = []

for i in tqdm(range(0, len(texts), batch_size)):
    batch = texts[i:i + batch_size]
    batch_vectors = model.encode(batch)
    vectors.extend(batch_vectors)
Step 4: Connect to PostgreSQL
import psycopg

conn = psycopg.connect(
    "postgresql://user:pswd@localhost:5432/faq"
)
conn.execute("CREATE EXTENSION IF NOT EXISTS vector")
Step 5: Create table to store the embeddings
conn.execute("""DROP TABLE IF EXISTS documents""")

conn.execute("""
    CREATE TABLE documents (
        id SERIAL PRIMARY KEY,
        course TEXT,
        section TEXT,
        question TEXT,
        answer TEXT,
        embedding vector(384)
    )
""")
Step 6: Insert the documents with embeddings
def vec_to_str(vector):
    return "[" + ",".join(str(x) for x in vector) + "]"

for doc, vec in tqdm(zip(documents, vectors), total=len(documents)):
    conn.execute(
        """
        INSERT INTO documents (course, section, question, answer, embedding)
        VALUES (%s, %s, %s, %s, %s::vector)
        """,
        (doc["course"], doc["section"], doc["question"], doc["answer"],
         vec_to_str(vec))
    )

conn.commit()
Step 7: Search for relevant documents with cosine similarity
query = "I just discovered the course. Can I still join it?"
query_vector = model.encode(query)
query_str = vec_to_str(query_vector)

results = conn.execute(
    """
    SELECT course, question, answer,
           1 - (embedding <=> %s::vector) AS similarity
    FROM documents
    ORDER BY embedding <=> %s::vector
    LIMIT 5
    """,
    (query_str, query_str)
).fetchall()

for row in results:
    print(f"[{row[0]}] {row[1]} (similarity: {row[3]:.4f})")
Step 8: Create index for faster search instead of simpe brute force
Step 9: Final search function
def pgvector_search(query, course="llm-zoomcamp", num_results=5):
    query_vector = model.encode(query)
    query_str = vec_to_str(query_vector)
    rows = conn.execute(
        """
        SELECT course, section, question, answer
        FROM documents
        WHERE course = %s
        ORDER BY embedding <=> %s::vector
        LIMIT %s
        """,
        (course, query_str, num_results)
    ).fetchall()

    return [
        {"course": r[0], "section": r[1], "question": r[2], "answer": r[3]}
        for r in rows
    ]
Step 10: Using the final search function with RAG Pipeline
from rag_helper import RAGBase
from dotenv import load_dotenv
from openai import OpenAI

class RAGPgVector(RAGBase):

    def __init__(self, embedder, conn, **kwargs):
        super().__init__(index=None, **kwargs)
        self.embedder = embedder
        self.conn = conn

    def search(self, query, num_results=5):
        query_vector = self.embedder.encode(query)
        query_str = vec_to_str(query_vector)

        rows = self.conn.execute(
            """
            SELECT course, section, question, answer
            FROM documents
            WHERE course = %s
            ORDER BY embedding <=> %s::vector
            LIMIT %s
            """,
            (self.course, query_str, num_results)
        ).fetchall()

        return [
            {"course": r[0], "section": r[1], "question": r[2], "answer": r[3]}
            for r in rows
        ]


load_dotenv()
openai_client = OpenAI()

vector_assistant = RAGPgVector(
    embedder=model,
    conn=conn,
    llm_client=openai_client,
)

print(vector_assistant.rag("the program has already begun, can I still sign up?"))
2-9 ONNX Embedder
The previous method of embedding documents into vectors uses PyTorch models. Setting up an environment for this can drastically increase the size of the overall deployment. We can reduce that by using ONNX Runtime based serving which can serve the same model, but without additional weight
Step 1: Create a separate project
mkdir llm-zoomcamp-onnx && cd llm-zoomcamp-onnx
uv init --no-workspace
uv add onnxruntime tokenizers numpy tqdm minsearch
uv add --dev huggingface-hub jupyter
uv run python -m ipykernel install --user --name llm-zoomcamp-onnx --display-name "llm-zoomcamp-onnx"
Step 2: Download the ONNX model from Huggingface
# download.py
import os
import shutil
import logging
from pathlib import Path
from huggingface_hub import hf_hub_download, list_repo_files

os.environ["HF_HUB_DISABLE_TELEMETRY"] = "1"
logging.getLogger("huggingface_hub").setLevel(logging.ERROR)

ONNX_CANDIDATES = [
    "onnx/model.onnx",
    "onnx/encoder_model.onnx",
    "model.onnx",
]

def download(repo, dest="models"):
    dest = Path(dest) / repo
    dest.mkdir(parents=True, exist_ok=True)

    files = list_repo_files(repo_id=repo)
    onnx_file = next((c for c in ONNX_CANDIDATES if c in files), None)
    if not onnx_file:
        raise FileNotFoundError(f"No ONNX model found in {repo}")

    for remote, local in [
        ("tokenizer.json", "tokenizer.json"),
        (onnx_file, "model.onnx"),
    ]:
        src = hf_hub_download(repo_id=repo, filename=remote)
        dst = dest / local
        if not dst.exists():
            shutil.copy2(src, dst)
            print(f"  saved {dst}")
        else:
            print(f"  exists {dst}")

    onnx_ext = onnx_file + "_data"
    if onnx_ext in files:
        src = hf_hub_download(repo_id=repo, filename=onnx_ext)
        dst = dest / "model.onnx_data"
        if not dst.exists():
            shutil.copy2(src, dst)
            print(f"  saved {dst}")
        else:
            print(f"  exists {dst}")

if __name__ == "__main__":
    download("Xenova/all-MiniLM-L6-v2")
We only download once - after that the downloaded model files can be used locally. Ensure the models directory is added to .gitignore to avoid committing.
Step 3: Generate embeddings using the ONNX Runtime model
# embedder.py
import numpy as np
import onnxruntime as ort
from tokenizers import Tokenizer
from pathlib import Path


class Embedder:
    def __init__(self, path="models/Xenova/all-MiniLM-L6-v2"):
        path = Path(path)
        self.tokenizer = Tokenizer.from_file(str(path / "tokenizer.json"))
        self.session = ort.InferenceSession(
            str(path / "model.onnx"), providers=["CPUExecutionProvider"]
        )
        self.input_names = {inp.name for inp in self.session.get_inputs()}

    def encode(self, text, normalize=True):
        return self.encode_batch([text], normalize=normalize)[0]

    def encode_batch(self, texts, normalize=True):
        self.tokenizer.enable_padding()
        encoded = self.tokenizer.encode_batch(texts)
        feed = {}
        if "input_ids" in self.input_names:
            feed["input_ids"] = np.array([e.ids for e in encoded], dtype=np.int64)
        if "attention_mask" in self.input_names:
            feed["attention_mask"] = np.array(
                [e.attention_mask for e in encoded], dtype=np.int64
            )
        if "token_type_ids" in self.input_names:
            feed["token_type_ids"] = np.array(
                [e.type_ids for e in encoded], dtype=np.int64
            )
        hidden = self.session.run(None, feed)[0]
        mask = feed["attention_mask"][..., None]
        pooled = (hidden * mask).sum(axis=1) / mask.sum(axis=1)
        if normalize:
            pooled = pooled / np.linalg.norm(pooled, axis=1, keepdims=True)
        return pooled
from embedder import Embedder
from ingest import load_faq_data
from tqdm.auto import tqdm
import numpy as np

documents = load_faq_data()
texts = [doc["question"] + " " + doc["answer"] for doc in documents]

embed = Embedder()

batch_size = 50
X = []

for i in tqdm(range(0, len(texts), batch_size)):
    batch = texts[i:i + batch_size]
    batch_vectors = embed.encode_batch(batch)
    X.extend(batch_vectors)

X = np.array(X)

query = "Can I still join the course after the start date?"
v_query = embed.encode(query)

scores = X.dot(v_query)
idx = np.argmax(scores)

print(documents[idx])
3. Orchestration
3-3 Setting up Kestra
Prerequisites:
- Docker with Docker Compose (Setup Docker Desktop to get both on Windows)
Write the Kestra setup in docker-compose.yml
volumes:
  kestra_postgres_data:
    driver: local
  kestra_data:
    driver: local
  kestra_tmp:
    driver: local

services:
  kestra_postgres:
    image: postgres:18
    volumes:
      - kestra_postgres_data:/var/lib/postgresql
    environment:
      POSTGRES_DB: kestra
      POSTGRES_USER: kestra
      POSTGRES_PASSWORD: k3str4
    healthcheck:
      test: ["CMD-SHELL", "pg_isready -d $${POSTGRES_DB} -U $${POSTGRES_USER}"]
      interval: 30s
      timeout: 10s
      retries: 10

  kestra:
    image: kestra/kestra:v1.3.21
    pull_policy: always
    user: "root"
    command: server standalone
    volumes:
      - kestra_data:/app/storage
      - /var/run/docker.sock:/var/run/docker.sock
      - /tmp/kestra-wd:/tmp/kestra-wd
    environment:
      SECRET_GEMINI_API_KEY: ${SECRET_GEMINI_API_KEY}
      SECRET_TAVILY_API_KEY: ${SECRET_TAVILY_API_KEY}
      SECRET_OPENAI_API_KEY: ${SECRET_OPENAI_API_KEY}
      KESTRA_CONFIGURATION: |
        datasources:
          postgres:
            url: jdbc:postgresql://kestra_postgres:5432/kestra
            driverClassName: org.postgresql.Driver
            username: kestra
            password: k3str4
        kestra:
          server:
            basicAuth:
              username: "admin@kestra.io"
              password: Admin1234!
          repository:
            type: postgres
          storage:
            type: local
            local:
              basePath: "/app/storage"
          queue:
            type: postgres
          tasks:
            tmpDir:
              path: /tmp/kestra-wd/tmp
          url: http://localhost:8080/
          ai:
            type: gemini
            gemini:
              model-name: gemini-2.5-flash
              api-key: ${GEMINI_API_KEY}
    ports:
      - "8080:8080"
      - "8081:8081"
    depends_on:
      kestra_postgres:
        condition: service_started
The docker-compose.yml file contains all the configuration needed to setup kestra and any supporting tools like the PostgreSQL DB
volumes: There are 3 volumes to store 3 kinds of data and all are stored and managed by using the built-in default storage driver. A dedicated directory for the volume is created on the host computer's hard drive. Storing data in this form helps persist data even after the container is deleted.
kestra_postgres_data: Stores the actual DB records from PostgreSQLkestra_data: Stores Kestra’s internal local storage files like uploaded assets, execution artifacts, etc.kestra_tmp: Configured as a local volume, though notably, it isn't explicitly attached under the services.kestra.volumes block in this specific file (a minor detail, but the other two are fully utilized).
kestra_postgres: This is the DB container with PostgreSQL service for Kestra.
- Uses the
postgres:18image of official PostgreSQL volumes: Mounts the named volumekestra_postgres_datainto the container's standard DB directory to ensure data persistenceenvironment: Stores all theenvvariables needed to work with the DB like DB name, username and password. For more secure operations, it is recommended to store sensitive information like passwords in a separate.envfilehealthcheck: Periodically runs thepg_isreadycommand inside the container to make sure the database is fully up, initialized, and accepting connections before other services try to use it.
kestra: Kestra service
pull_policy: Ensures Docker checks for updated image on every launchuser: "root": Container runs with root permissions since Kestra needs to interact with the host system's Docker socket to launch task runnerscommand: server standalone: Start Kestra in standalone mode - all components like the Web UI, executor, worker etc run inside one container
volumes: Volume mounts for all the services
kestra_data:/app/storage: Maps the named volume to Kestra's internal storage path./var/run/docker.sock:/var/run/docker.sock: Crucial step. This allows Kestra to talk to the host's Docker daemon. If a Kestra workflow requires running a task inside a separate Docker container (e.g., a Python or Node.js script container), it uses this socket to spin them up./tmp/kestra-wd:/tmp/kestra-wd: Mounts a host directory to act as a working directory for tasks executing on the host.
environment: All ENV variables like the LLM API Keys and Kestra Configuration settings
datasources.postgres: Configures Kestra's database connection string using the credentials specified in the PostgreSQL service. Note that the URL host iskestra_postgres, leveraging Docker's internal DNS network.kestra.server.basicAuth: Sets up the basic Web UI login credentials (User:admin@kestra.io, Password:Admin1234!).repository / queue / storage: Instructs Kestra to use PostgreSQL for storing workflow states and message queuing, and to use the local disk for file storage.ai: Sets up native AI assistants within Kestra utilizing Google's gemini-2.5-flash model.
ports: Exposes port 8080 (the main Kestra Web UI) and 8081 (typically used for internal management or metrics endpoints) to your host computer. Kestra UI access via http://localhost:8080.
depends_on: Instruction to Docker Compose to ensure Kestra container starts only after Kestra PostgreSQL container has successfully started.
3-5 Retreival Augmented Generation
Kestra allows us to use the capabilities of LLMs to answer questions, with and wihout context from RAG.
To perform a series of one or more steps, Kestra allows us to implement flows which can determine the steps and the order to complete them, defined in yml files.
Case 1: Without RAG
This Kestra blueprint demonstrates the limitations of using a Large Language Model (LLM) without Retrieval-Augmented Generation (RAG). It asks the model about specific, recent software features ("Kestra 1.1") that likely fall outside or beyond its static training data, resulting in a hallucinated or outdated response.
1. Workflow Metadata
id: 1_chat_without_rag
namespace: zoomcamp
description: |
  This flow demonstrates what happens when you query an LLM WITHOUT RAG.
  The model can only rely on its training data, which may be outdated or incomplete.

  After running this, check out 2_chat_with_rag.yaml to see how RAG fixes these issues!
id: The unique identifier for this specific workflow (1_chat_without_rag).namespace: Used to logically group workflows. Here, it belongs to thezoomcampproject or course folder.description: Contextual documentation explaining that this flow serves as a baseline comparison against a RAG-enabled flow (2_chat_with_rag.yaml).
2. Task 1: Querying the LLM (chat_without_rag)
- id: chat_without_rag
  type: io.kestra.plugin.ai.completion.ChatCompletion
  description: Query about Kestra 1.1 features WITHOUT RAG
  provider:
    type: io.kestra.plugin.ai.provider.OpenAI
    modelName: gpt-5-nano
    apiKey: "{{ secret('OPENAI_API_KEY') }}"
  messages:
    - type: USER
      content: |
        Which features were released in Kestra 1.1?
        Please list at least 5 major features with brief descriptions.
type: Uses Kestra's official AI plugin (ChatCompletion) to interact with an LLM.provider: Connects to OpenAI using thegpt-5-nanomodel. It securely retrieves the required authentication token via Kestra's internal secrets manager ({{ secret('OPENAI_API_KEY') }}).messages: Sends a prompt directly to the model asking for specific technical release notes regarding "Kestra 1.1". Because no external documentation or search context is provided, the model must rely purely on its pre-trained knowledge base.
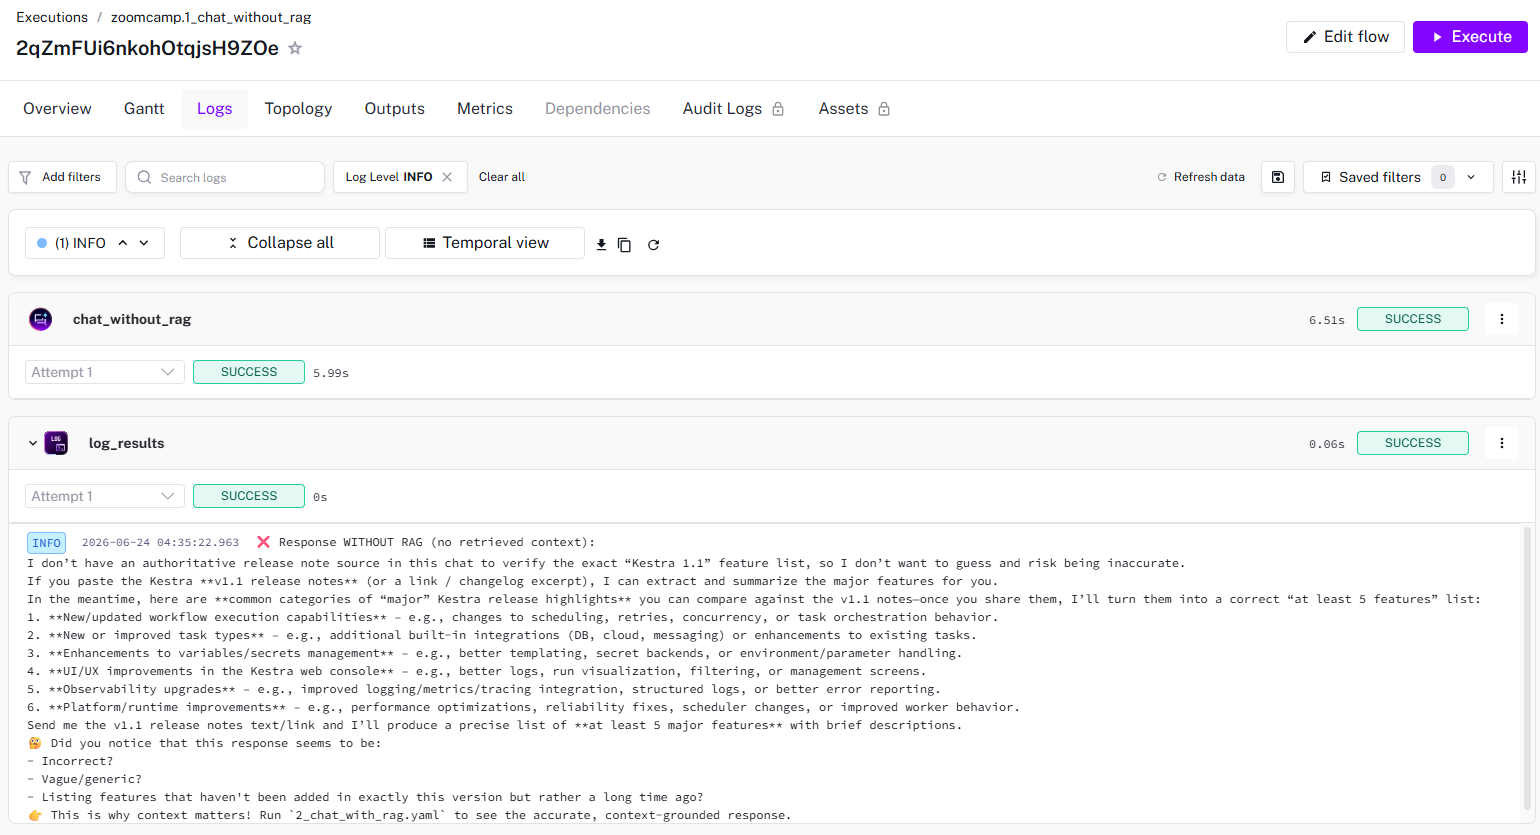
3. Task 2: Logging the Output (log_results)
- id: log_results
  type: io.kestra.plugin.core.log.Log
  message: |
    ❌ Response WITHOUT RAG (no retrieved context):
    {{ outputs.chat_without_rag.textOutput }}

    🤔 Did you notice that this response seems to be:
    - Incorrect?
    - Vague/generic?
    - Listing features that haven't been added in exactly this version but rather a long time ago?

    👉 This is why context matters! Run `2_chat_with_rag.yaml` to see the accurate, context-grounded response.
type: Uses Kestra's core logging engine to print data to the execution console.{{ outputs.chat_without_rag.textOutput }}: This uses Kestra's dynamic Pebble templating engine. It references the exact text output generated by the previouschat_without_ragtask and prints it out.- Educational Note: The log concludes with a prompt to help you realize that without real-time data or explicit context documents (RAG), the LLM's response is likely vague, incorrect, or entirely hallucinated.
Sample logs of executing this flow on Kestra is shown below
Case 2: With RAG
The following Kestra flow shows how the chat will work with the help of context through RAG. By programmatically pulling the specific documentation, transforming it into a searchable format, and passing it alongside the prompt, it grounds the Large Language Model (LLM) in facts—ensuring an accurate response instead of a guess or hallucination.
1. Workflow Metadata
id: 2_chat_with_rag
namespace: zoomcamp
description: |
  This flow demonstrates RAG (Retrieval Augmented Generation) by ingesting Kestra release documentation and using it to answer questions accurately.

  Compare this with 1_chat_without_rag.yaml to see the difference RAG makes!
id: The unique identifier for this specific workflow (2_chat_with_rag).namespace: The logical grouping container, matching thezoomcampfolder or project layer.description: Explicit documentation explaining the structural objective: showcasing how RAG solves the data limitations exposed in the first baseline flow.
2. Task 1: Ingesting the Documentation (ingest_release_notes)
- id: ingest_release_notes
  type: io.kestra.plugin.ai.rag.IngestDocument
  description: Ingest Kestra 1.1 release notes to create embeddings
  provider:
    type: io.kestra.plugin.ai.provider.GoogleGemini
    modelName: gemini-embedding-001
    apiKey: "{{ secret('GEMINI_API_KEY') }}"
  embeddings:
    type: io.kestra.plugin.ai.embeddings.KestraKVStore
  drop: true
  fromExternalURLs:
    - https://raw.githubusercontent.com/kestra-io/docs/refs/heads/main/src/contents/blogs/release-1-1/index.md
type: Deploys the RAG engine's document ingest plugin (IngestDocument).provider: Leverages Google Gemini'sgemini-embedding-001model to calculate vector embeddings (numerical meaning maps) from the text data. It pulls your credentials securely using{{ secret('GEMINI_API_KEY') }}.embeddings: Identifies where to store those calculated vectors. It uses Kestra's local, built-in key-value storage engine (KestraKVStore).drop: true: Tells Kestra to clear out any old data sitting in that KV bucket before saving the new ones, preventing stale information mix-ups.fromExternalURLs: Points directly to the source of truth—the raw markdown release notes for Kestra 1.1 hosted on GitHub.
3. Task 2: Context-Anchored Generation (chat_with_rag)
- id: chat_with_rag
  type: io.kestra.plugin.ai.rag.ChatCompletion
  description: Query about Kestra 1.1 features with RAG context
  chatProvider:
    type: io.kestra.plugin.ai.provider.GoogleGemini
    modelName: gemini-2.5-flash
    apiKey: "{{ secret('GEMINI_API_KEY') }}"
  embeddingProvider:
    type: io.kestra.plugin.ai.provider.GoogleGemini
    modelName: gemini-embedding-001
    apiKey: "{{ secret('GEMINI_API_KEY') }}"
  embeddings:
    type: io.kestra.plugin.ai.embeddings.KestraKVStore
  systemMessage: |
    You are a helpful assistant that answers questions about Kestra.
    Use the provided documentation to give accurate, specific answers.
    If you don't find the information in the context, say so.
  prompt: |
    Which features were released in Kestra 1.1?
    Please list at least 5 major features with brief descriptions.
type: Uses the specialized RAG-focusedChatCompletionvariant, which combines vector lookups with conversational text generation.- **
chatProvider&embeddingProvider**: Splitting the duties.gemini-2.5-flashacts as the analytical brain generating the final words, whilegemini-embedding-001parses the search index to find matched document snippets. embeddings: Binds this query step back to the sameKestraKVStorepopulated during Task 1.systemMessage: Imposes strict boundaries on the model. It commands the AI to stay within the text provided and explicitly order it to admit when it doesn't know something rather than guessing.prompt: The exact same product question asked in Case 1. This time, however, the text from the GitHub URL is quietly attached to it under the hood.
4. Task 3: Logging the Grounded Results (log_results)
- id: log_results
  type: io.kestra.plugin.core.log.Log
  message: |
    ✅ RAG Response (with retrieved context):
    {{ outputs.chat_with_rag.textOutput }}

    🎉 Note that this response is detailed, accurate, and grounded in the actual release documentation. Compare this with the output from 1_chat_without_rag.yaml!
type: Standard execution logger utility.{{ outputs.chat_with_rag.textOutput }}: Evaluated dynamically at runtime via Kestra's Pebble templating. It catches the output of the RAG step and prints it out.
Case 3: Extending RAG with websearch
- The example above shows the implementation of static RAG - documents containing information are ingested and then used to answer user queries.
- With web search as another information retriever, we can have the latest information from the internet acting as the context for the LLM response.
3-6 Agents
Case 1: Simple AI Agent Chaining
This Kestra blueprint demonstrates how to build and orchestrate a multi-step AI agent pipeline. It highlights how to pass structured inputs to an agent, chain the output of one agent into another, use global plugin defaults to eliminate repetitive configuration, and monitor performance via token tracking metrics.
1. Workflow Metadata & Inputs
id: 4_simple_agent
namespace: zoomcamp
description: |
  This flow demonstrates a basic AI agent that summarizes text with controllable length and language. It shows:
  - How to structure agent prompts
  - How to chain multiple agent tasks
  - How to use pluginDefaults to avoid repetition
  - How to track token usage for cost monitoring
- **
id&namespace**: Uniquely identifies this flow as4_simple_agentinside thezoomcampworkspace group. inputs: Outlines three runtime configurations that parameters can adjust:summary_length: A dropdown menu (SELECT) offeringshort,medium, orlongtargets.language: A dropdown selection supporting multiple language locales (e.g.,en,fr,ja).text: A string parameter containing the default multi-paragraph background text about Kestra and LLM Zoomcamp to process.
2. Task 1: Conditional Multi-Lingual Summary (multilingual_agent)
- id: multilingual_agent
  type: io.kestra.plugin.ai.agent.AIAgent
  description: Generate summary in requested language and length
  systemMessage: |
    You are a precise technical assistant.
    Produce a {{ inputs.summary_length }} summary in {{ inputs.language }}.
    Keep it factual, remove fluff, and avoid marketing language.
    If the input is empty or non-text, return a one-sentence explanation.

    Output format guidelines:
    - For 'short': 1-2 sentences
    - For 'medium': 2-5 sentences
    - For 'long': 1-3 paragraphs
  prompt: |
    Summarize the following content: {{ inputs.text }}
type: Deploys Kestra's specializedAIAgentplugin class designed for structured prompt engineering.systemMessage: Sets strict formatting and constraints. It references dynamic inputs using Pebble templates ({{ inputs.summary_length }}and{{ inputs.language }}) to inject user configuration directly into the agent's foundational behavior rules before looking at the dataset.prompt: Passes the core target string data payload dynamically.
3. Task 2: Linear Task Chaining (english_brevity)
- id: english_brevity
  type: io.kestra.plugin.ai.agent.AIAgent
  prompt: |
    Generate exactly 1 sentence English summary of the following:
    "{{ outputs.multilingual_agent.textOutput }}"
- Agent Chaining: This step demonstrates how Kestra coordinates sequential dependencies. Instead of processing raw user inputs a second time, it listens for the upstream text payload via
{{ outputs.multilingual_agent.textOutput }}. - Downstream Reduction: It instructs the LLM to rewrite whatever text the first agent produced (even if it was a long summary in German or Japanese) into a highly concise, single-sentence English overview.
4. Task 3: Token Monitoring & Cost Analytics (log_token_usage)
- id: log_token_usage
  type: io.kestra.plugin.core.log.Log
  message: |
    📊 Token Usage Summary:

    Multilingual Agent:
    - Input tokens: {{ outputs.multilingual_agent.tokenUsage.inputTokenCount }}
    - Output tokens: {{ outputs.multilingual_agent.tokenUsage.outputTokenCount }}
    - Total tokens: {{ outputs.multilingual_agent.tokenUsage.totalTokenCount }}

    English Brevity Agent:
    - Input tokens: {{ outputs.english_brevity.tokenUsage.inputTokenCount }}
    - Output tokens: {{ outputs.english_brevity.tokenUsage.outputTokenCount }}
    - Total tokens: {{ outputs.english_brevity.tokenUsage.totalTokenCount }}
- Cost Tracking: AI API workloads incur usage costs per token. Kestra's AI plugin automatically captures granular usage data from the underlying provider's payload response meta metadata.
- Metadata Inspection: Accesses specific properties within the
.tokenUsageoutput object mapped to individual metrics (inputTokenCount,outputTokenCount,totalTokenCount) to output operational logging visibility into console histories.
5. Global Optimization (pluginDefaults)
pluginDefaults:
  - type: io.kestra.plugin.ai.agent.AIAgent
    values:
      provider:
        type: io.kestra.plugin.ai.provider.GoogleGemini
        modelName: gemini-2.5-flash
        apiKey: "{{ secret('GEMINI_API_KEY') }}"
- DRY Compliance (Don't Repeat Yourself): Instead of manually duplicating the
provider,modelName, andapiKeyproperties within bothmultilingual_agentandenglish_brevity, this block applies them globally. - Inheritance Mechanism: Any task throughout this entire file matching
type: io.kestra.plugin.ai.agent.AIAgentautomatically inherits these configuration values implicitly behind the scenes, keeping the individual task code blocks minimal and secure.
Here are the step-by-step markdown notes for Case 4, detailing the advanced web research agent configuration in Kestra.
Case 2: Autonomous Web Research Agent with Tools
1. Workflow Metadata & Dynamic Inputs
id: 5_web_research_agent
namespace: zoomcamp
description: |
  This flow demonstrates an advanced AI agent that uses tools autonomously.
  The agent:
  - Decides when to use the web search tool
  - Gathers information from multiple sources
  - Synthesizes findings into a structured report
  - Saves the output as a markdown file
  Key concept: You specify the GOAL, the agent decides HOW to achieve it.
- **
id&namespace**: Tracks this workflow under the unique identifier5_web_research_agentwithin thezoomcampcluster. inputs: Establishes a flexible runtime configuration string variable calledresearch_topic. This allows users to alter the entire focus of the research project from the UI menu, with a comprehensive default topic focused on data orchestration trends, AI patterns, and technical innovations.
2. Task 1: Empowering the Autonomous Agent (research_agent)
- id: research_agent
  type: io.kestra.plugin.ai.agent.AIAgent
  description: Autonomous research agent with web search capabilities
  provider:
    type: io.kestra.plugin.ai.provider.GoogleGemini
    apiKey: "{{ secret('GEMINI_API_KEY') }}"
    modelName: gemini-2.5-flash
  prompt: "{{ inputs.research_topic }}"
provider: Powered directly by Google Gemini'sgemini-2.5-flashengine, authenticated using Kestra's secure backend secrets manager.systemMessage: Acts as a strict execution playbook for the agent. It lays out a step-by-step operational loop: loop queries through search tools until information is dense enough, format a specific markdown template structure, write to disk, and mandate zero hallucinations.
3. Extending capabilities with Content Retrievers and Tools
The magic of this task lies within its internal tool accessories:
contentRetrievers:
  - type: io.kestra.plugin.ai.retriever.TavilyWebSearch
    apiKey: "{{ secret('TAVILY_API_KEY') }}"
    maxResults: 10
tools:
  - type: io.kestra.plugin.ai.tool.DockerMcpClient
    image: mcp/filesystem
    command: ["/tmp"]
    binds: ["{{workingDir}}:/tmp"]
outputFiles:
  - research_report.md
contentRetrievers(Web Intelligence): Plugs inTavilyWebSearch, a search engine optimized for LLM RAG queries. It enables the model to issue raw API searches on the web, grab up to 10 relevant page snippets at a time, and analyze current live data before typing a word.tools(Local Operations): Leverages a Model Context Protocol (MCP) tool calledmcp/filesystemisolated inside a secure Docker container. By linking Kestra's unique runtime engine path ({{workingDir}}) to the container's internal/tmpfolder, the agent gains a physical sandbox to create, write, and alter concrete documents.outputFiles: Declares thatresearch_report.mdis a persistent artifact generated by this execution step, exposing the file globally to downline workflows or user downloads inside the Kestra UI.
4. Task 2: Tracking Execution Outcomes (log_report)
- id: log_report
  type: io.kestra.plugin.core.log.Log
  message: |
    ✅ Research completed!
    📄 Report saved to: {{ outputs.research_agent.outputFiles['research_report.md'] }}
    🔍 Agent made autonomous decisions about:
    - Which searches to perform
    - How many searches were needed
    - How to structure the report
    - When the task was complete
    📊 Token usage: {{ outputs.research_agent.tokenUsage.totalTokenCount }} tokens
- Output Validation: Employs Kestra's core tracking module to log confirmation details safely to the UI execution desk.
- Dynamic File Referencing: Pulls the physical storage address link from the previous step via
{{ outputs.research_agent.outputFiles[...] }}to show exactly where the generated report artifact lives. - Telemetry Logging: References the agent's absolute token usage (
.totalTokenCount) to verify operational resource metrics on complex multi-loop research sessions.
3-7 Multi-Agent Systems
Case 1: Multi-Agent Research System
1. Workflow Metadata & Architecture Overview
id: 6_multi_agent_research
namespace: zoomcamp
description: |
  This flow demonstrates a multi-agent system where specialized agents collaborate.
  Architecture:
  - Main Agent (Analyst): Synthesizes findings and creates structured reports
  - Research Agent (Tool): Gathers web data using Tavily search
  The main agent uses the research agent as a TOOL, demonstrating how agents can delegate specialized work to other agents.
- **
id&namespace**: Registers this workflow under the identifier6_multi_agent_researchinside thezoomcampproject workspace. inputs: Dynamically parameterizes the workflow to accept acompany_namestring via the user interface, routing a default value ofkestra.io.
2. The Primary Agent Orchestrator (analysis)
- id: analysis
  type: io.kestra.plugin.ai.agent.AIAgent
  description: Main analyst agent that orchestrates research
  configuration:
    logRequests: false
    logResponses: false
  provider:
    type: io.kestra.plugin.ai.provider.GoogleGemini
- Role Definition: The main task acts as a Main analyst agent. Its primary function is synthesis, reasoning, and JSON structural layout compilation.
- Strict Response Shaping: The
systemMessageandpromptspecify strict data extraction structures. It commands the model to emit a single, valid JSON map—strictly forbidding markdown styling snippets, background chatter, or standard ```json block boundaries. This allows Kestra to safely treat the text response as data payload.
3. Agent-as-a-Tool Delegation Pattern
The unique design feature of this flow resides directly inside the analyst's tools configurations block:
tools:
  - type: io.kestra.plugin.ai.tool.AIAgent
    description: Web research and data gathering
    systemMessage: |
      You are a research assistant that searches the web for factual and up-to-date company information as of date {{ now() }}.
      Look for recent news from this year, funding announcements, blog posts, or competitor mentions.
      Return concise factual summaries — no markdown, no formatting, no speculation.
    provider:
      type: io.kestra.plugin.ai.provider.GoogleGemini
    contentRetrievers:
      - type: io.kestra.plugin.ai.retriever.TavilyWebSearch
        apiKey: "{{ secret('TAVILY_API_KEY') }}"
- Sub-Agent Spawn: Rather than exposing a raw API directly to the manager, Kestra mounts a full secondary
AIAgentwrapped inside a function-calling definition loop. - Time-Aware Search: The researcher's system template tracks live execution dates using Kestra's temporal variables (
{{ now() }}). It leverages theTavilyWebSearchtool to look up recent data points and filters out long prose, passing only condensed facts back to the supervisor agent.
4. Advanced Native Object Parsing (parse_results)
Because the primary agent successfully produced a raw string structured as an explicit JSON map, downline tasks can unpack it natively using Pebble templating features:
- id: parse_results
  type: io.kestra.plugin.core.log.Log
  message: |
    🎯 Competitive Intelligence Report
    =====================================

    Company: {{ json(outputs.analysis.textOutput).company }}
    Summary: {{ json(outputs.analysis.textOutput).summary }}

    Recent News:
    {% for news in json(outputs.analysis.textOutput).recent_news %}
    - {{ news.title }} ({{ news.date }})
      {{ news.description }}
    {% endfor %}

    Competitors:
    {% for competitor in json(outputs.analysis.textOutput).competitors %}
    - {{ competitor }}
    {% endfor %}
json()Function: Evaluates the raw text block coming out of the analyst workspace (outputs.analysis.textOutput) and automatically converts it into a structural Pebble object variable on-the-fly.- Programmatic Iteration: Leverages standard jinja-like loop blocks (
{% for news in ... %}) to step through data lists effortlessly, cleanly mapping properties like headlines, dates, and competitors into readable, structured system logs.
5. Global Provider Shared Inheritance (pluginDefaults)
pluginDefaults:
  - type: io.kestra.plugin.ai.provider.GoogleGemini
    values:
      modelName: gemini-2.5-flash
      apiKey: "{{ secret('GEMINI_API_KEY') }}"
- Cascading Properties: This global variable layout ensures that any configuration referencing the Google Gemini vendor block (including both the outer main supervisor agent and the deep nested sub-agent tool) automatically inherits the identical
gemini-2.5-flashmodel mapping and credential access keys seamlessly without manual code duplication.
3-8 Best Practices
- Architecture: Use Traditional Workflows for predictable ETL pipelines, RAG for data-grounded questions, and AI Agents / Multi-Agents for complex, autonomous research.
- Cost Control: Default to the cheaper Gemini 2.5 Flash, cap lengths with maxOutputTokens, and actively monitor token usage logs.
- Security: Never hardcode API keys. Always use Kestra's secure variable injection: {{ secret('SECRET_NAME') }}.
- Observability: Set logRequests: true and logResponses: true during development to audit prompt reasoning and tool execution outputs.
- Production: Implement robust task retries for API failures, cap costs, and heavily test for response consistency across diverse inputs.
4. Evaluation
Measure retrieval and answer quality with offline and online eval
5. Monitoring
Monitor user feedback and system health with live dashboards
6. Best Practices
LangChain, hybrid search. Combine vector + keyword search; rerank results for higher precision
7. End-to-End Project
A complete project example: a fitness assistant built with LLMs
Capstone Project
Ship a complete end-to-end project of your choice from scratch